Rust, Lambda, and DynamoDB
November 18, 2022
As part of my journey to learn more about Rust development, I developed a Lambda service hosted on AWS that writes to a DynamoDB database and an associated Rust HTTP client. Along with Rust, I used Terraform to manage the deployment of the AWS resources. This article is the 4th I’ve written on my Wireless Thermostat application that runs on a Raspberry Pi. You can find the others here: Raspberry Pi Wireless Thermostat - in Rust, Rust Cross Compiling Made Easy, and Implementing Multi-Threaded Shared Memory in Rust. We are going to cover the following in this article:
- Define a JSON API as a separate crate shared across two related projects.
- Write an AWS Lambda function in Rust, using the AWS Rust SDK, that accepts an HTTP POST with a JSON payload of data, and writes the data to a DynamoDB database.
- Use Terraform to define and build the database, the lambda function, and the permissions glue required to have all the pieces fit together.
- Use the AWS CLI to deploy Lambda application executable updates.
- Write a Rust HTTP Client that sends the data to our Lambda function.
I assume you have the AWS CLI, Terraform, and Rust installed on your system, and your AWS account is set up and connected to the CLI. It’s a bit of work, but easy to follow under each system’s documentation.
The use case for my application is to keep track of my Raspberry Pi thermostat application’s status and record history. A Rust application running on a Raspberry Pi will push information to a cloud database. With activity data in a cloud database, monitoring the application’s health can be done by examining the data – and avoiding having to open firewalls to let in outside observers. I also get a data source for history, which I can graph on a UI later.
I picked DynamoDB on AWS as the database platform. My data needs fit easily inside DynamoDB’s free tier, and DynamoDB is an effective place to push IoT time series data. Instead of directly connecting the Pi application to the Dynamo database, I chose an HTTP-based service layer for the interface between the Raspberry PI and AWS. I’ve found HTTP services to be more resilient than direct DB connections – HTTP’s stateless nature makes it self-correcting across network outages. Pushing data through to a DB is an excellent job for a Lambda function – and with AWS recently publishing a Rust SDK, I took the opportunity to build out the Lambda function as a Rust application. Here’s a picture of how the pieces fit together that we are going to examine:
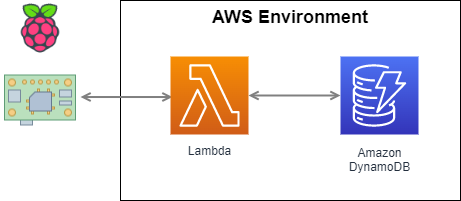
There are three main parts to the application. First, the main application is thermostat_pi, the client that creates the data we move to the database. Under this project is the Lambda function project, named push_temp. Lastly, the temp_data project holds a definition of a data transport API. All three projects are on GitHub under the thermostat_pi application.
In temp_data, I started with a Rust struct that holds the data pieces for the thermostat application and enabled serde for JSON representation:
use serde::Deserialize;
use serde::Serialize;

#[derive(Debug, Serialize, Deserialize)]
pub struct TempData {
    pub record_date: String,
    pub thermostat_on: bool,
    pub temperature: f32,
    pub thermostat_value: u16,
}
I created this in a separate Rust crate so that it could be shared with both the Pi application and lambda function projects – ensuring both always were in sync. The Cargo.toml looks like this:
[package]
name = "temp-data"
version = "0.1.0"
edition = "2021"
license = "MIT"

[dependencies]
serde = {version = "1", features = ["derive"]}
I then defined a corresponding DynamoDB database to hold this information. I decided on a Partition Key of “day” for the time-series data, which allows for retrieving a day’s worth of data without scanning the entire table. I also created a sort key for the date/time. This key structure will allow efficient read access to the data when I want to set up an alarm or graph historical data. I don’t have much experience with DynamoDB, so there could be a more efficient way to solve this problem – but what I have works for me. Here’s what the DynamoDB table will look like when we are finished:
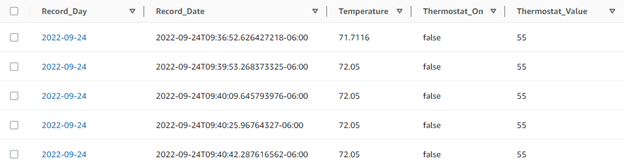
The Record_Day and Record_Date keys are strings to DynamoDB. The Record_Date format is RFC3339, which the Rust standard time package supports. It creates a string that can sort the time values correctly by alphabetical sorting. Next, we build the lambda function to take our incoming request and store it in the DynamoDB table. The push-temp directory of my main project (GitHub link) is where this lives. The Cargo.toml contains these entries:
[package]
name = "push_temp"
version = "0.1.0"
edition = "2021"
license = "MIT OR Apache-2.0"

[dependencies]
aws-config = "0.51.0"
aws-sdk-dynamodb = "0.21.0"
log = "0.4.14"
serde = {version = "1", features = ["derive"]}
tokio = "1.16.1"
tracing-subscriber = { version = "0.3", features = ["env-filter"] }
lambda_http = "0.7"
serde_json = "1.0.78"

# Our package that defines the struct of the incoming request
temp-data = { path="../temp-data" }
We are using the AWS SDK for Rust. I put all the Rust code in the main.rs file for our lambda function. First, there is some boilerplate to import our message struct, define our response types, and get the Lambda environment set up:
use aws_sdk_dynamodb::model::AttributeValue;
use aws_sdk_dynamodb::Client;
use lambda_http::{lambda_runtime::Error, service_fn, IntoResponse, Request};

extern crate temp_data;
use temp_data::TempData;

use log::{debug, error};
use serde::Serialize;

#[derive(Debug, Serialize)]
struct SuccessResponse {
    pub body: String,
}

#[derive(Debug, Serialize)]
struct FailureResponse {
    pub body: String,
}

// Implement Display for the Failure response so that we can then implement Error.
impl std::fmt::Display for FailureResponse {
    fn fmt(&self, f: &mut std::fmt::Formatter<'_>) -> std::fmt::Result {
        write!(f, "{}", self.body)
    }
}

impl std::error::Error for FailureResponse {}
The main() function registers an event handler for the incoming event; our handler function is named “my_handler”:
#[tokio::main]
async fn main() -> Result<(), Error> {
    tracing_subscriber::fmt::init();
    debug!("logger has been set up");

    lambda_http::run(service_fn(my_handler)).await?;

    Ok(())
}
Our my_handler() function will run when an incoming request arrives. Our my_handler() function needs to do a couple of things. First, it grabs the incoming JSON from the request and parses it into our struct, request_struct. Notice that if the JSON parsing fails, an error value returns at this point.
async fn my_handler(request: Request) -> Result<impl IntoResponse, Error> {
    debug!("handling a request, Request is: {:?}", request);

    let request_json = match request.body() {
        lambda_http::Body::Text(json_string) => json_string,
        _ => "",
    };
    debug!("Request JSON is : {:?}", request_json);
    let request_struct: TempData = serde_json::from_str(request_json)?;
Next, we need to push this struct into our DynamoDB table. I’m choosing to separate each data element into its own DynamoDB attribute instead of storing the JSON directly. We do some minor data formatting to pull out the day as a separate attribute to use as our Partition Key. The rest of the struct values convert into AttributeValues for the Dynamo DB API. Our error handling hides DynamoDB-specific error messages from the end user as an implementation detail.
    // set up as a DynamoDB client
    let config = aws_config::load_from_env().await;
    let client = Client::new(&config);

    // build the values that are stored in the DB
    let record_date_av = AttributeValue::S(request_struct.record_date.clone());
    let thermostat_on_av = AttributeValue::S(request_struct.thermostat_on.to_string());
    let temperature_av = AttributeValue::N(request_struct.temperature.to_string());
    let thermostat_value_av = AttributeValue::N(request_struct.thermostat_value.to_string());
    let record_day_av: AttributeValue = AttributeValue::S(request_struct.record_date[..10].to_string());

    // Store our data in the DB
    let _resp = client
        .put_item()
        .table_name("Shop_Thermostat")
        .item("Record_Day", record_day_av)
        .item("Record_Date", record_date_av)
        .item("Thermostat_On", thermostat_on_av)
        .item("Temperature", temperature_av)
        .item("Thermostat_Value", thermostat_value_av)
        .send()
        .await
        .map_err(|err| {
            error!("failed to put item in Shop_Thermostat, error: {}", err);
            FailureResponse {
                body: "The lambda encountered an error and your message was not saved".to_owned(),
            }
        })?;

    debug! {
        "Successfully stored item {:?}", &request_struct
    }

    Ok("the lambda was successful".to_string())
}
To deploy our custom Lambda function to AWS, we need to create an executable called “bootstrap.” We need Rust to build our executable by cross-compiling to the x86_64-unknown-linux-musl target – which is what the Lambda run time requires. I like using just as a command runner and created a simple justfile for the build, which runs the two commands we need to produce the executable called “bootstrap” in our local directory. I use the cross tool (cargo install cross), which pulls down a Docker container for the cross-compile environment. The AWS SDK documents alternatives to cross if you don’t want to use a local docker container. Finally, we copy the produced executable to the magic file name of “bootstrap” and store it in our project root.
build:
    cross build --release --target x86_64-unknown-linux-musl
    cp target/x86_64-unknown-linux-musl/release/push_temp bootstrap
We could manually deploy our Lambda function by zipping up the bootstrap file and uploading it through the AWS web interface. But other AWS pieces need to go around the Lambda function for everything to work. We need to set up permissions for the Lambda function to insert data into our DynamoDB tables and permissions for executing the Lambda function itself.
Recently, AWS has published a means to create a Lambda Function URL – an HTTPS endpoint directly connected to a Lambda function. For simple use cases like ours, a Lambda Function URL allows for a simpler setup and avoids having to create an API gateway endpoint. If an API gateway endpoint is important to you, I’d suggest reading this article which includes the additional steps needed. My approach is a simplified version of the one described.
We could use the AWS console to create our Lambda Function, Function URL, and DynamoDB– but it’s not very repeatable. Instead, let’s use Terraform to define the pieces we need to have a repeatable process. It also gives us a clean way to delete everything when we want to do that. I split up the Terraform configuration into a set of files for each piece of our deployment, all located in the root of the push_temp crate. First, a variables.tf file will define a couple of shared values we’ll need:
# Input variable definitions, adjust for your needs

variable "aws_region" {
  description = "AWS region for all resources."

  type    = string
  default = "us-east-2"
}

variable "push_temp_bin_path" {
  description = "The binary path for the lambda."

  type    = string
  default = "./bootstrap"
}
Then, a main.tf file sets up our environment:
terraform {
  required_providers {
    aws = {
      source  = "hashicorp/aws"
      version = "~> 4.0"
    }
    archive = {
      source  = "hashicorp/archive"
      version = "~> 2.2.0"
    }
  }

  required_version = "~> 1.0"

  }
}

provider "aws" {
  region = var.aws_region
}

data "aws_caller_identity" "current" {}
Now we can set up each of the resources we need to deploy. First, we create the DynamoDB table. Note that we define the two columns we use as keys, and the rest get dynamically created as we insert data. Our keys are strings, so we use the type = “S” to define them. We initialize the table at the lowest possible resource usage, as we have a single little Raspberry Pi sending us data.
# aws_dynamodb_table.shop-thermostat-table:
resource "aws_dynamodb_table" "shop-thermostat-table" {
  hash_key       = "Record_Day"
  name           = "Shop_Thermostat"
  range_key      = "Record_Date"
  billing_mode   = "PAY_PER_REQUEST"
  read_capacity  = 0
  write_capacity = 0

  attribute {
    name = "Record_Day"
    type = "S"
  }
  attribute {
    name = "Record_Date"
    type = "S"
  }
}
Next, we can define our lambda function. We need to provide the .zip file of our executable to Terraform for the initial deployment to set up the Lambda function. I don’t want to use Terraform to deploy our executable on every application change – Terraform is not a CI/CD tool. But we need something to create the function. So after the resources are all created successfully, we will use a different method to deploy application updates.
We also set up a Lambda Function URL as the publicly reachable endpoint.
# PUSH TEMP
# Here we grab the compiled executable and use the archive_file package
# to convert it into the .zip file we need.
data "archive_file" "push_temp_lambda_archive" {
  type = "zip"

  source_file = var.push_temp_bin_path
  output_path = "bootstrap.zip"
}

# Here we set up an IAM role for our Lambda function
resource "aws_iam_role" "push_temp_lambda_execution_role" {
  assume_role_policy = <<EOF
{
  "Version": "2012-10-17",
  "Statement": [
    {
      "Action": "sts:AssumeRole",
      "Principal": {
        "Service": "lambda.amazonaws.com"
      },
      "Effect": "Allow",
      "Sid": ""
    }
  ]
}
EOF

}

# Here we attach a permission to execute a lambda function to our role
resource "aws_iam_role_policy_attachment" "push_temp_lambda_execution_policy" {
  role       = aws_iam_role.push_temp_lambda_execution_role.name
  policy_arn = "arn:aws:iam::aws:policy/service-role/AWSLambdaBasicExecutionRole"
}

# Here is the definition of our lambda function
resource "aws_lambda_function" "push_temp_lambda" {
  function_name = "PushTemp"

  source_code_hash = data.archive_file.push_temp_lambda_archive.output_base64sha256
  filename         = data.archive_file.push_temp_lambda_archive.output_path

  handler = "func"
  runtime = "provided"

  # here we enable debug logging for our Rust run-time environment. We would change
  # this to something less verbose for production.
  environment {
    variables = {
      "RUST_LOG" = "debug"
    }
  }

  #This attaches the role defined above to this lambda function
  role = aws_iam_role.push_temp_lambda_execution_role.arn
}

// Add lambda -> DynamoDB policies to the lambda execution role
resource "aws_iam_role_policy" "write_db_policy" {
  name = "lambda_write_db_policy"
  role = aws_iam_role.push_temp_lambda_execution_role.name

  policy = <<EOF
{
  "Version": "2012-10-17",
  "Statement": [
    {
      "Sid": "",
      "Action": [
        "dynamodb:PutItem"
      ],
      "Effect": "Allow",
      "Resource": "arn:aws:dynamodb: :${var.aws_region}::${data.aws_caller_identity.current.account_id}:table/Shop_Thermostat"
    }
  ]
}
EOF
}

// The Lambda Function URL that allows direct access to our function
resource "aws_lambda_function_url" "push_temp_function" {
  function_name      = aws_lambda_function.push_temp_lambda.function_name
  authorization_type = "NONE"
}
Lastly, we create an output file so we can get the API endpoint for calling our function:
# Output value definitions

output "invoke_url" {
  value = aws_lambda_function_url.push_temp_function.function_url
}
Whew, that’s all done! A terraform init & terraform apply will create all the stuff, upload our newly compiled function, and make it ready for testing!
We can call the external endpoint through curl, replacing < endpoint > below with the value that terraform outputs on the apply.
curl -X POST https://<endpoint>.lambda-url.us-east-2.on.aws/ \
-H 'Content-Type: application/json' \
-d '{"record_date":"2022-02-03T13:22:22","thermostat_on":true,"temperature":"65","thermostat_value":"64"}'
You can use the DynamoDB console to see your new record in the database:

To make application updates to the code after the initial deployment, I created a deploy target in my justfile for the commands needed to deploy an updated application. These commands rely on the AWS CLI to be installed and configured for the same region as the Lambda function.
deploy: build
    cp target/x86_64-unknown-linux-musl/release/push_temp bootstrap
    zip bootstrap.zip bootstrap
    aws lambda update-function-code --function-name PushTemp --zip-file fileb://./bootstrap.zip
Now that we have a working back-end that can accept an HTTP Post with our JSON data and persist it in DynamoDB, we can create a Rust front-end that sends that request. Our Cargo.toml in the main application again has a reference to our shared TempData crate so that we can use the shared struct.
[dependencies]
temp-data = { path="temp-data" }
I created a function store_temp_data() to use whenever new data is available within the Rust application. I pass in the data and the endpoint URL, which is in the run-time configuration elsewhere. I’m using the reqwest crate for the base HTTP client. Our function starts by initializing the client and building the request structure TempData we saw earlier. We also grab the current time and convert it to the RFC3339 format.
use reqwest;
use reqwest::Error;
use time::format_description::well_known::Rfc3339;
use time::macros::offset;
use time::OffsetDateTime;

extern crate temp_data;
use temp_data::TempData;

pub async fn store_temp_data(
    thermostat_on: bool,
    current_temp: f32,
    thermostat_value: i16,
    aws_url: &str,
) -> Result<(), Error> {

    let client = reqwest::Client::new();

    // Get the current time, offset to my timezone
    let now = OffsetDateTime::now_utc().to_offset(offset!(-6));
    let now = now.format(&Rfc3339).unwrap();

    let body = TempData {
        record_date: now,
        thermostat_on: thermostat_on,
        temperature: current_temp
        thermostat_value: thermostat_value
    };
Next, we send the request to our endpoint, serializing it into JSON along the way, and handle the response. I’m choosing to log the error and return OK on an error, as this is a non-critical function for our application.
    let response = client
        .post(aws_url)
        .json(&body)
        .send()
        .await;

    match response {
        Ok(r) => {
            tracing::debug!("response: {:?}", r);
        }
        Err(e) => {
            tracing::error!("Error sending to AWS, {}", e);
        }
    }

    Ok(())
}
And that’s it! For the five things we set out to accomplish, here are our key takeaways:
- We are defining the TempData struct in a separate crate (directory) with its own Cargo.toml giving us a common referenceable structure for the API between our client and server applications. Utilizing the struct to define a JSON-based interface between the client and server, and using serde to serialize and deserialize our TempData structure on either end, is simple to set up and keep in sync across our projects.
- The AWS Rust SDK provides easy-to-use interfaces for Rust for Lambda definition and DynamoDB access. Rust makes for a great Labmda execution environment, with its speed and low memory footprint.
- Terraform works great to build out all of the AWS components we need and set up the permissions pieces required to glue everything together.
- Using the AWS CLI is an easy way to update our Lambda executable on demand.
- The reqwest crate gives us a straightforward means to send HTTP requests for our client application.
I hope you find this useful on your Rust journey! If you have any improvement ideas, please provide feedback in the comments.